Bạn có nhiều lựa chọn khác nhau để thiết lập Datepicker trong Bootstrap. Bài viết sẽ hướng dẫn thiết lập datepicker bằng Bootstrap với 4 tùy chọn khác nhau.
Thiết lập datepicker trong Bootstrap là một nhiệm vụ dễ dàng khi chúng ta dùng khởi tạo datepicker và thêm các tùy chọn cho nó. Đầu tiên, bạn cần hiểu ý nghĩa của Datepicker.
Bootstrap Datepicker là một repository mã nguồn mở, cung cấp API để tích hợp bộ chọn ngày tháng vào front end của web. Hầu hết các biểu mẫu được tạo ngày nay đều dùng datepicker để nhập ngày tháng thay vì nhập theo cách thủ công. Datepicker là một tiện ích input cung cấp cho người dùng trình xem lịch để chọn ngày tháng. Bạn có nhiều lựa chọn thiết lập datepicker trong Bootstrap.
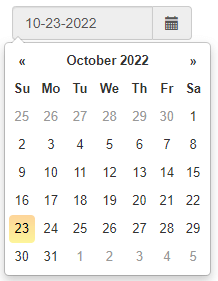
Cú pháp
$("#datepickerID").datepicker({
          OPTIONS
    }).datepicker('update', new Date());
Chi tiết từng bước thực hiện:
- Đầu tiên, tạo file HTML với phần nội dung trang, trường nhập và các phần tử khác. Tạo các tệp javascript và CSS, nếu cần, bao gồm chúng trong file HTML.
- Thêm JAVASCRIPT để khởi tạo một datepicker. Thêm các lựa chọn khác để có những hàm khác nhau trong datepicker.
- Làm theo định dạng code bên dưới để liên kết một số CSS bên ngoài vào code bên trong thẻ
<head>. - Thêm các link CDN sau để cho phép sử dụng datepicker.
Bootstrap 3.0+ (Link CSS và JS):
<link href=”https://maxcdn.bootstrapcdn.com/bootstrap/3.2.0/css/bootstrap.min.css” rel=”stylesheet” type=”text/css” />
<script src=”https://cdn.jsdelivr.net/npm/popper.js@1.12.9/dist/umd/popper.min.js” integrity=”sha384-ApNbgh9B+Y1QKtv3Rn7W3mgPxhU9K/ScQsAP7hUibX39j7fakFPskvXusvfa0b4Q” crossorigin=”anonymous”></script>
<script src=”https://cdn.jsdelivr.net/npm/bootstrap@4.0.0/dist/js/bootstrap.min.js” integrity=”sha384-JZR6Spejh4U02d8jOt6vLEHfe/JQGiRRSQQxSfFWpi1MquVdAyjUar5+76PVCmYl” crossorigin=”anonymous”></script>
UX Solutions Datepicker 1.2+
<link rel=”stylesheet” href=”https://cdnjs.cloudflare.com/ajax/libs/bootstrap-datepicker/1.9.0/css/bootstrap-datepicker.min.css”>
<script src=”https://cdnjs.cloudflare.com/ajax/libs/bootstrap-datepicker/1.9.0/js/bootstrap-datepicker.min.js”></script>- Thêm class sẵn có trong Bootstrap Datepicker vào trường nhập theo yêu cầu.
- Lúc này, bạn có thể thêm các lựa chọn datepicker khi trường chọn ngày tháng được tạo.
- Sau đó, bạn cần khởi tạo bộ chọn ngày cho trường nhập để khi người dùng click trường nhập đó, lịch pop-up sẽ hiện. Sau đó, họ có thể chọn ngày từ cửa sổ nhắc nhở đó.
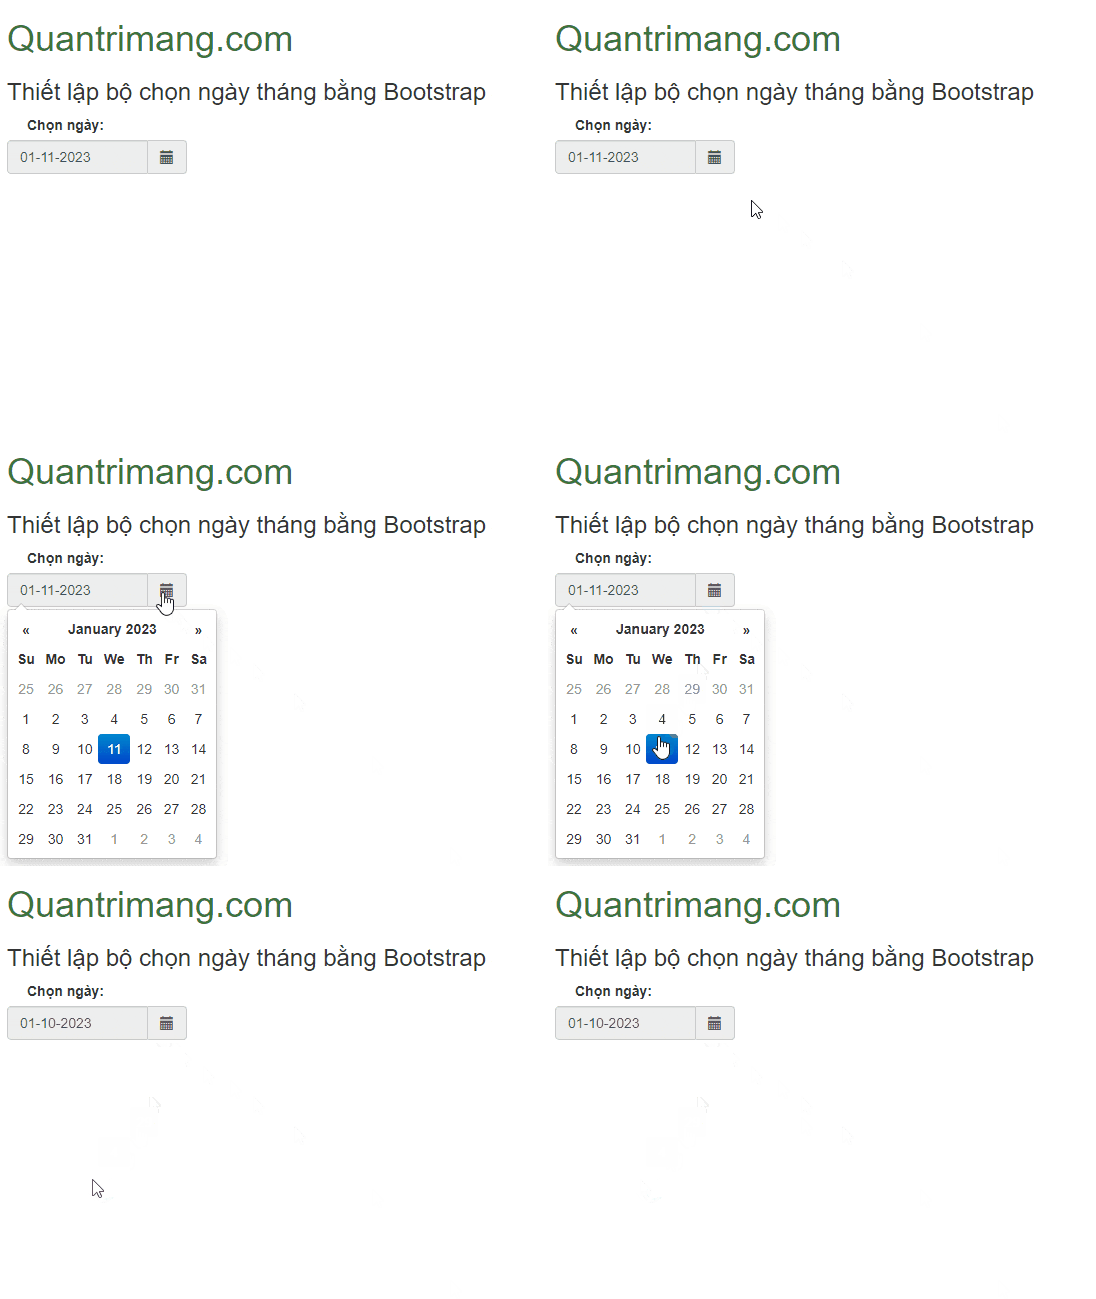
Ví dụ 1: Ở ví dụ này, chúng ta thiết lập datepicker trong Bootstrap với tùy chọn autoclose và todayhighlight. Một autoclose tự động đóng datepicker sau khi chọn ngày tháng. Todayhighlight highlight ngày tháng hôm nay.
<!DOCTYPE html>
<html lang="en">

<head>
    <meta charset="UTF-8">
    <meta name="viewport"
          content="width=device-width,
                   initial-scale=1.0">
    <link href=
"https://maxcdn.bootstrapcdn.com/bootstrap/3.2.0/css/bootstrap.min.css"
          rel="stylesheet" type="text/css" />
    <link rel="stylesheet" href=
"https://cdnjs.cloudflare.com/ajax/libs/bootstrap-datepicker/1.9.0/css/bootstrap-datepicker.min.css">
    <title>Bootstrap Datepicker</title>
    <style>
      label{margin-left: 20px;}
      #datepicker{width:180px;}
      #datepicker > span:hover{cursor: pointer;}
    </style>
 </head>

<body>
    <div class="container">
        <h1 class="text-success font-weight-bold">
            Quantrimang.com
        </h1>
        <h3>
            Thiết lập bộ chọn ngày tháng bằng Bootstrap
        </h3>
        <label>Chọn ngày: </label>
        <div id="datepicker"
             class="input-group date"
             data-date-format="mm-dd-yyyy">
            <input class="form-control"
                   type="text" readonly />
            <span class="input-group-addon">
                <i class="glyphicon glyphicon-calendar"></i>
            </span>
        </div>
    </div>

    <script src="https://code.jquery.com/jquery-3.6.1.min.js"
        integrity=
    "sha256-o88AwQnZB+VDvE9tvIXrMQaPlFFSUTR+nldQm1LuPXQ="
        crossorigin="anonymous">
    </script>
    <script>
        $(function () {
            $("#datepicker").datepicker({
                autoclose: true,
                todayHighlight: true,
            }).datepicker('update', new Date());
        });
    </script>
    <script src=
"https://cdn.jsdelivr.net/npm/popper.js@1.12.9/dist/umd/popper.min.js"
        integrity=
"sha384-ApNbgh9B+Y1QKtv3Rn7W3mgPxhU9K/ScQsAP7hUibX39j7fakFPskvXusvfa0b4Q"
        crossorigin="anonymous">
    </script>
    <script src=
"https://cdn.jsdelivr.net/npm/bootstrap@4.0.0/dist/js/bootstrap.min.js"
        integrity=
"sha384-JZR6Spejh4U02d8jOt6vLEHfe/JQGiRRSQQxSfFWpi1MquVdAyjUar5+76PVCmYl"
        crossorigin="anonymous">
    </script>
    <script src=
"https://cdnjs.cloudflare.com/ajax/libs/bootstrap-datepicker/1.9.0/js/bootstrap-datepicker.min.js">
    </script>
</body>

</html>
Kết quả:
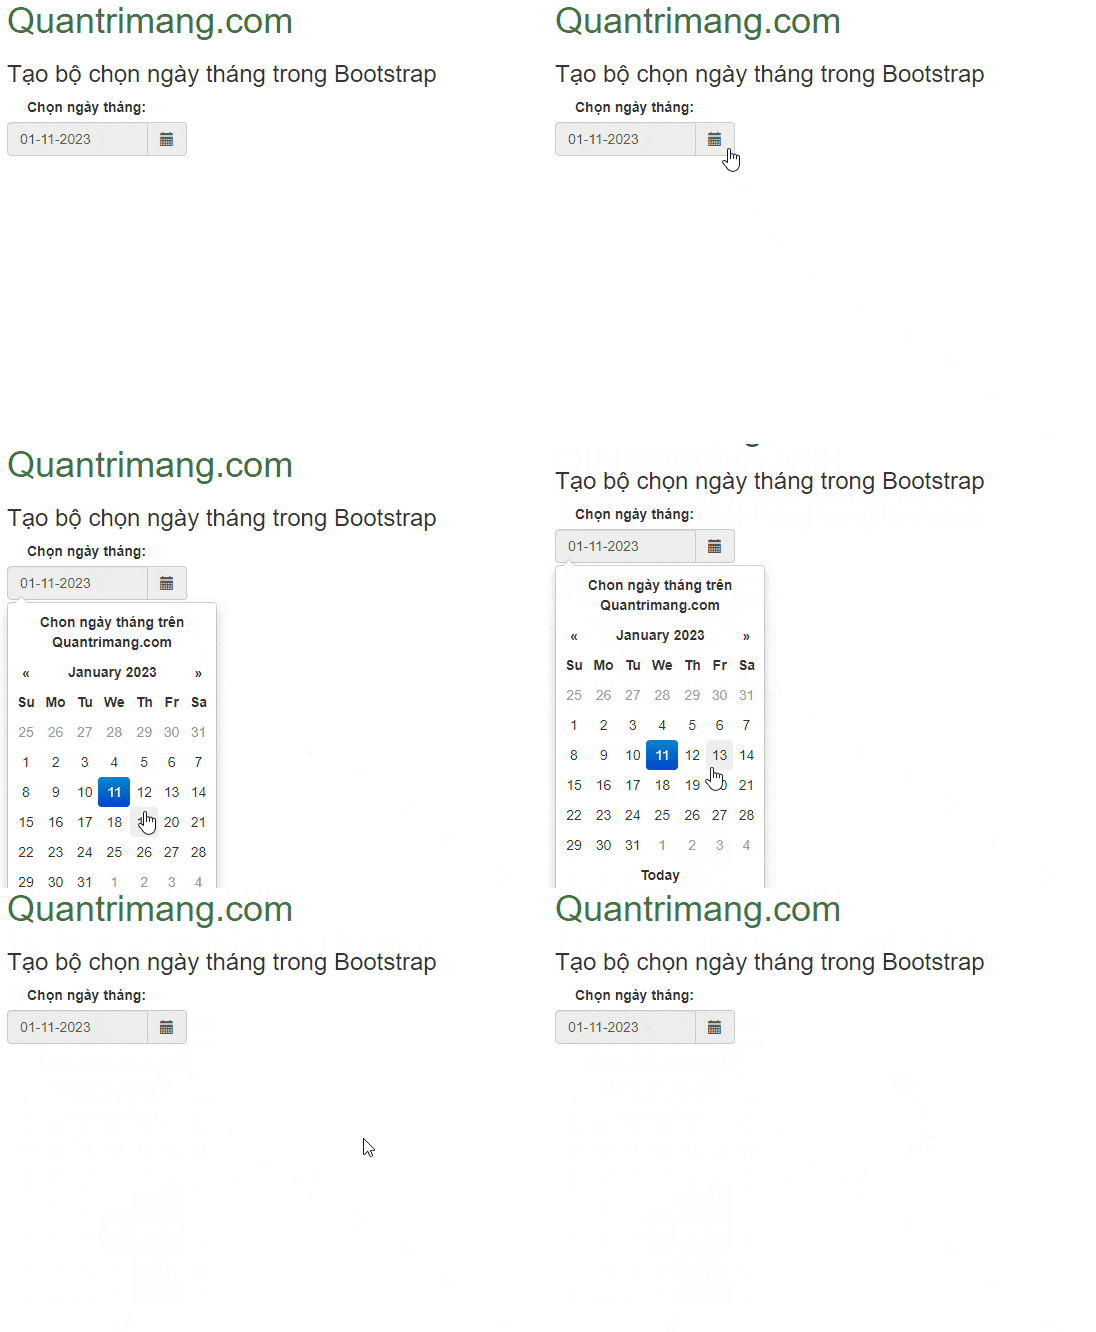
Ví dụ 2: Thêm todayBtn sẽ bổ sung nút ngày hôm nay ở phía dưới cùng của datepicker, cho phép người dùng chọn ngày hôm nay. Ngoài ra, bạn cũng cần thêm tùy chọn tiêu đề hiện tên của datepicker. Chúng ta sẽ dùng ví dụ ở trên bằng cách cập nhật code, nơi tập lệnh này có cả hai lựa chọn đã được bổ sung cho hàm ngày tháng.
<!DOCTYPE html>
<html lang="en">

<head>
    <meta charset="UTF-8">
    <meta name="viewport"
          content="width=device-width,
                   initial-scale=1.0">
    <link href=
"https://maxcdn.bootstrapcdn.com/bootstrap/3.2.0/css/bootstrap.min.css"
          rel="stylesheet"
          type="text/css" />
    <link rel="stylesheet"
          href=
"https://cdnjs.cloudflare.com/ajax/libs/bootstrap-datepicker/1.9.0/css/bootstrap-datepicker.min.css">
    <title>Bootstrap Datepicker</title>

    <style>
        label{margin-left: 20px;}
        #datepicker{width:180px;}
        #datepicker > span:hover{cursor: pointer;}
    </style>
</head>

<body>
    <div class="container">
        <h1 class="text-success font-weight-bold">
            Quantrimang.com
        </h1>
        <h3>
            Tạo bộ chọn ngày tháng trong Bootstrap
        </h3>
        <label>Chọn ngày tháng: </label>
        <div id="datepicker"
             class="input-group date"
             data-date-format="mm-dd-yyyy">
            <input class="form-control"
                   type="text" readonly />
            <span class="input-group-addon">
                <i class="glyphicon glyphicon-calendar"></i>
            </span>
        </div>
    </div>

    <script src=
"https://code.jquery.com/jquery-3.6.1.min.js"
        integrity=
"sha256-o88AwQnZB+VDvE9tvIXrMQaPlFFSUTR+nldQm1LuPXQ="
        crossorigin="anonymous">
    </script>

    <script>
        $(function () {
            $("#datepicker").datepicker({
                autoclose: true,
                todayHighlight: true,
                todayBtn : "linked",
                title : "Chon ngày tháng trên Quantrimang.com"
            }).datepicker('update', new Date());
        });
    </script>
    <script src=
"https://cdn.jsdelivr.net/npm/popper.js@1.12.9/dist/umd/popper.min.js"
        integrity=
"sha384-ApNbgh9B+Y1QKtv3Rn7W3mgPxhU9K/ScQsAP7hUibX39j7fakFPskvXusvfa0b4Q"
        crossorigin="anonymous">
    </script>
    <script src=
"https://cdn.jsdelivr.net/npm/bootstrap@4.0.0/dist/js/bootstrap.min.js"
        integrity=
"sha384-JZR6Spejh4U02d8jOt6vLEHfe/JQGiRRSQQxSfFWpi1MquVdAyjUar5+76PVCmYl"
        crossorigin="anonymous">
    </script>
    <script src=
"https://cdnjs.cloudflare.com/ajax/libs/bootstrap-datepicker/1.9.0/js/bootstrap-datepicker.min.js">
    </script>
</body>
</html>
Kết quả:
Trên đây là cách tạo datepicker cho web, ứng dụng bằng Bootstrap. Hi vọng bài viết hữu ích với các bạn.
 Công nghệ
  AI
AI  Windows
  iPhone
  Android
  Học IT
  Download
  Tiện ích
  Khoa học
  Game
Game  Làng CN
  Ứng dụng






 Lập trình


 Linux
Linux  Đồng hồ thông minh
  macOS
macOS  Chụp ảnh - Quay phim
  Thủ thuật SEO
  Phần cứng
  Kiến thức cơ bản
  Dịch vụ công trực tuyến
  Dịch vụ nhà mạng
  Quiz công nghệ
  Microsoft Word 2016
  Microsoft Word 2013
  Microsoft Word 2007
  Microsoft Excel 2019
  Microsoft Excel 2016
  Microsoft PowerPoint 2019
  Google Sheets
  Học Photoshop
  Lập trình Scratch
  Bootstrap
  Năng suất
  Game - Trò chơi
  Hệ thống
  Thiết kế & Đồ họa
  Internet
  Bảo mật, Antivirus
  Doanh nghiệp
  Ảnh & Video
  Giải trí & Âm nhạc
  Mạng xã hội
  Lập trình
  Giáo dục - Học tập
  Lối sống
  Tài chính & Mua sắm
  AI Trí tuệ nhân tạo
  ChatGPT
  Gemini
  Điện máy
  Tivi
Tivi  Tủ lạnh
  Điều hòa
  Máy giặt
  Cuộc sống
  TOP
TOP  Kỹ năng
  Món ngon mỗi ngày
  Nuôi dạy con
  Mẹo vặt
  Phim ảnh, Truyện
  Làm đẹp
  DIY - Handmade
  Du lịch
  Quà tặng
  Giải trí
  Là gì?
  Nhà đẹp
  Giáng sinh - Noel
  Hướng dẫn
  Ô tô, Xe máy
  Tấn công mạng
  Chuyện công nghệ
  Công nghệ mới
  Trí tuệ Thiên tài