Quản Trị Mạng - Đây là bài viết chi tiết về quá trình cài đặt, thiết lập và cấu hình hệ thống OpenSUSE 11.3 64bit (x86_64) server có thể đáp ứng được tất cả các nhu cầu và dịch vụ cần thiết như: Apache web server (SSL-capable) hỗ trợ PHP, CGI và SSI, Postfix mail server với SMTP-AUTH, TLS và tài khoản người dùng ảo, BIND DNS server, Pureftpd FTP server, MySQL server, Dovecot POP3/IMAP, Quota, Firewall …
Trong hệ thống thử nghiệm này, chúng ta sẽ sử dụng những ứng dụng như:
- Web Server: Apache 2.2 và PHP 5
- Database Server: MySQL
- Mail Server: Postfix và tài khoản người dùng ảo
- DNS Server: BIND
- FTP Server: pureftpd
- POP3/IMAP: Dovecot
- Webalizer và AWStats để thống kê lượng truy cập website
Khi hoàn thành bài thử nghiệm này, các bạn có thể thiết lập, quản lý hệ thống server với ISPConfig 3 control panel (trên nền tảng OpenSUSE 64bit). Lưu ý thêm rằng, những bước này chỉ hoạt động với ISPConfig 3.0.1 hoặc mới hơn, không phù hợp với những phiên bản trước đó như ISPConfig 2.x
Yêu cầu
Đĩa DVD cài đặt OpenSUSE 11.3, các bạn có thể tải file *.iso từ đây và ghi ra đĩa DVD. 1 đường truyền Internet ổn định.
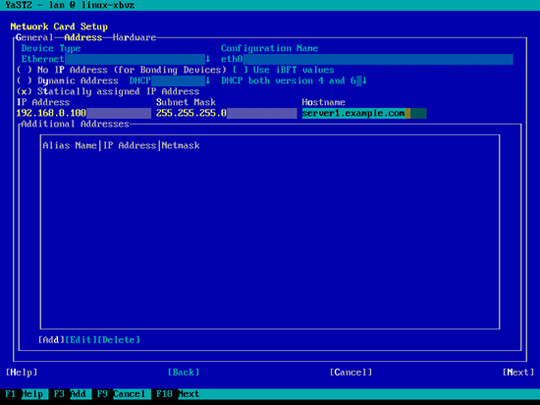
Trong bài viết này chúng ta sử dụng hostname server1.example.com và địa chỉ IP 192.168.0.100, gateway 192.168.0.1.
Cài đặt hệ thống cơ bản
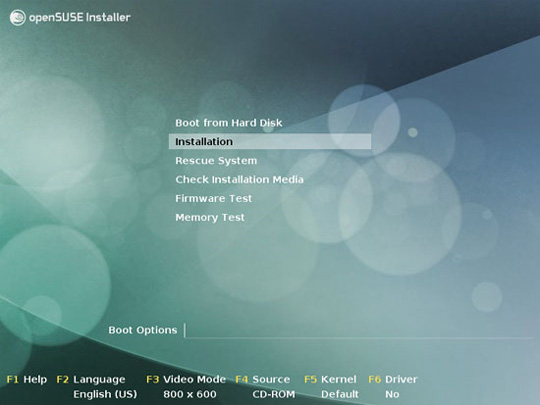
Khởi động từ đĩa DVD cài OpenSUSE 11.3 và chọn Installation:
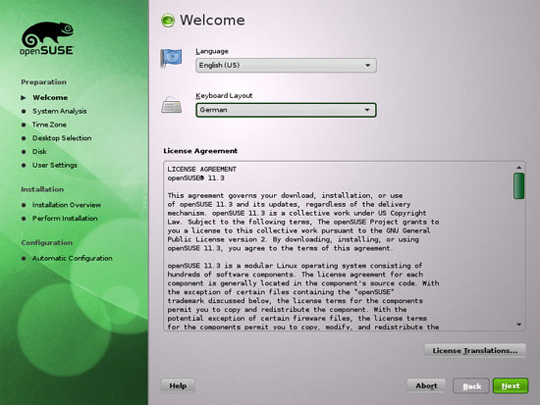
Lựa chọn chế độ ngôn ngữ hiển thị, chuẩn bàn phím và chấp nhận với điều khoản thỏa thuận sử dụng của nhà sản xuất:
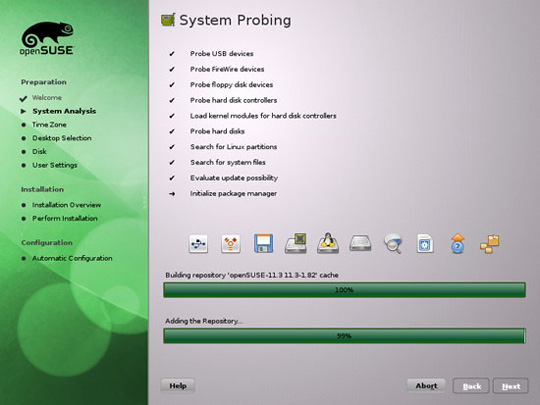
Hệ thống sẽ tiến hành phân tích, thu thập thông tin về phần cứng, đồng thời xây dựng bộ nhớ đệm ứng dụng cung cấp repository:
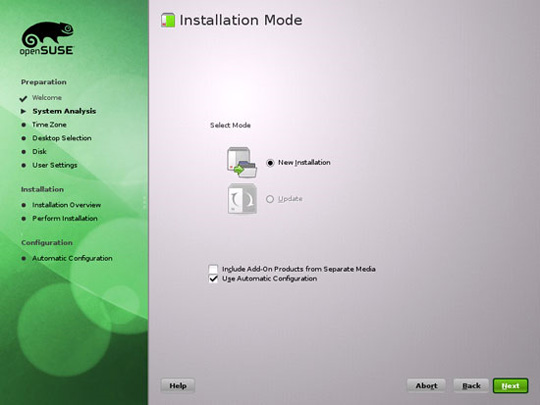
Tại màn hình tiếp theo, chọn New Installation:
Chọn tiếp vị trí địa lý và múi giờ:

Tại màn hình tiếp theo, chọn Other > Minimal Server Selection (Text Mode) khi muốn cài đặt server mà không cần đến tính năng X-Window desktop. Hệ thống X-Window thực ra không hề cần thiết để 1 server hoạt động, bên cạnh đó nó còn làm chậm toàn bộ hệ thống. Chúng ta cần thực hiện tất cả các tác vụ cần thiết đối với 1 administrator trực tiếp hoặc thông qua kết nối SSH, ví dụ như thông qua PuTTY từ remote desktop:

Chọn Edit Partition Setup... để thay đổi phân vùng được sử dụng. Trong bài viết này, chúng ta cần 1 phân vùng /srv đủ lớn bên trong /home:
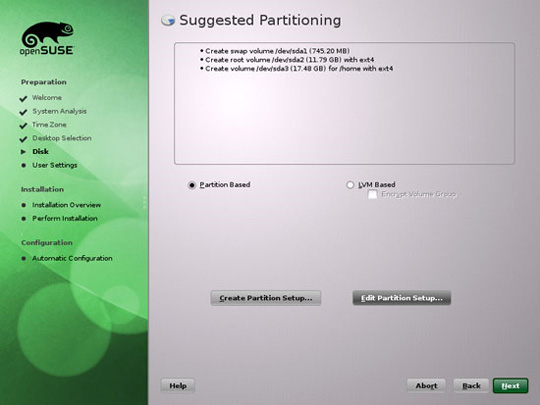
Tiếp tục chọn /dev/sda3 và Edit:
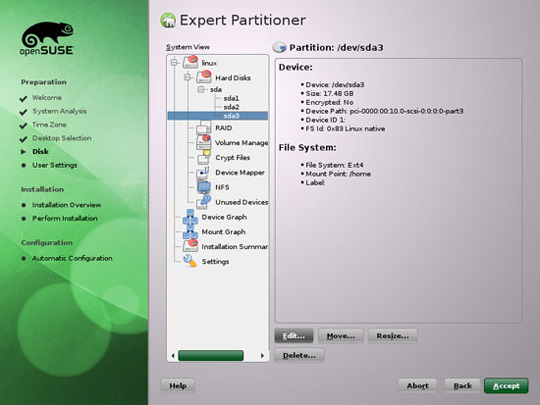
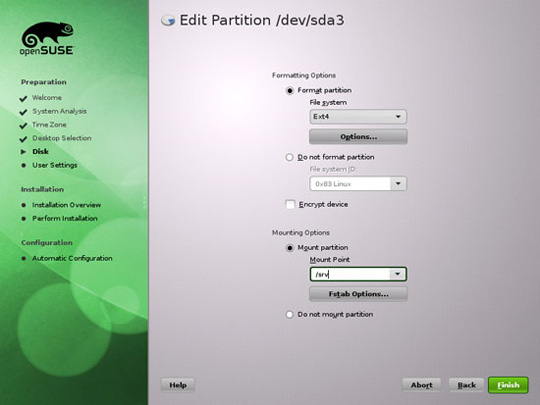
Thay đổi Mount Point thành /srv, sau đó nhấn Finish:
Sau đó, chọn Accept:
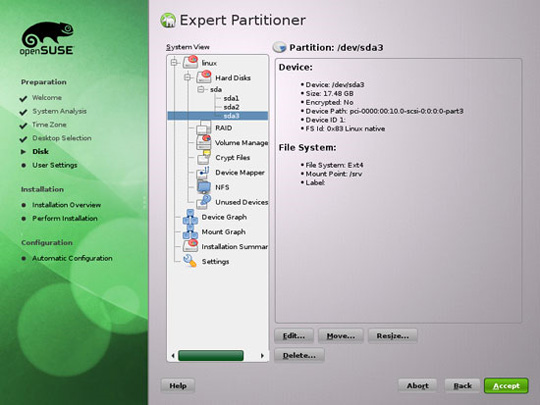
Next:
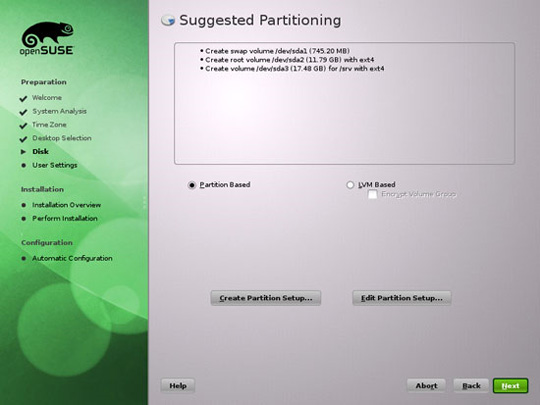
Tại đây, chúng ta sẽ tạo tài khoản người dùng với tên là administrator (bạn có thể đặt tên tùy thích), bỏ trống ô Automatic Login của tài khoản này, mật khẩu khởi tạo ở đây sẽ được dùng như mật khẩu root:
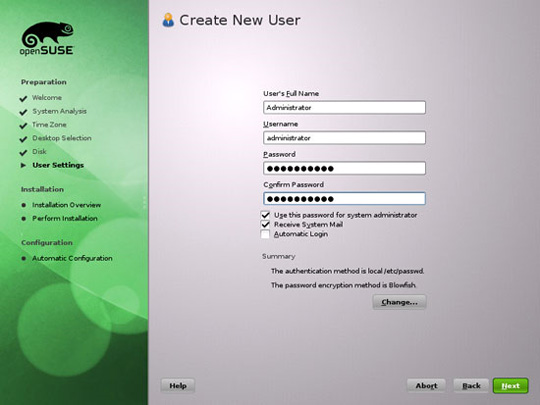
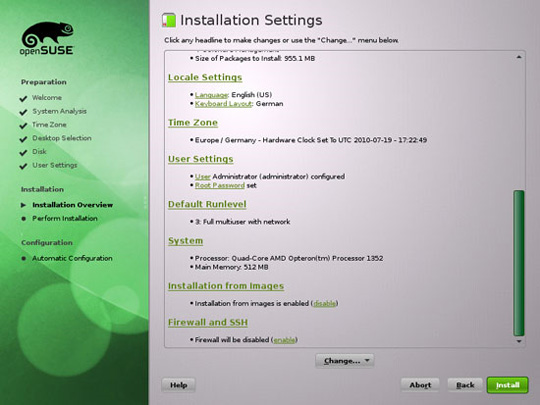
Sau đó, hệ thống sẽ hiển thị chi tiết các thiết lập, di chuyển xuống phía dưới tới phần Firewall and SSH và kích hoạt tính năng SSH:
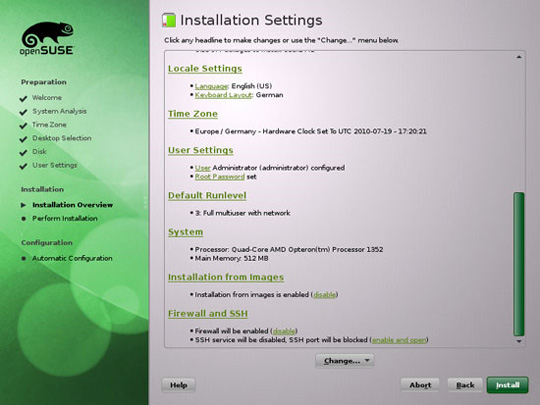
và tắt bỏ tính năng firewall (vì ISPConfig 3 đã tích hợp sẵn firewall đi kèm):
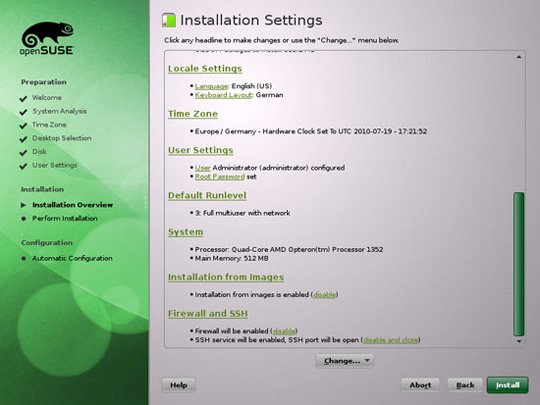
Bấm Install để bắt đầu quá trình cài đặt:
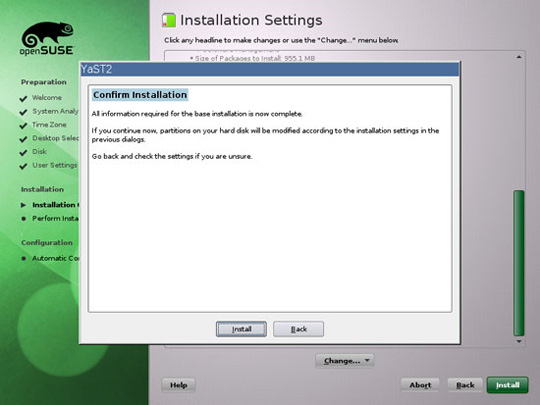
Xác nhận lại lần nữa rằng bạn đồng ý cài đặt hệ thống:
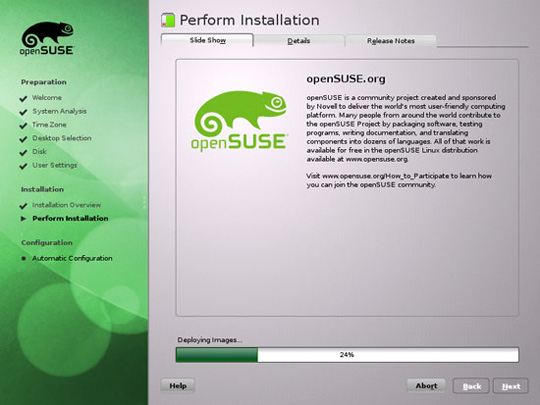
Hệ thống sẽ định dạng lại ổ cứng, cài đặt các gói phần mềm và các thông số kỹ thuật khác cho lần khởi động tiếp theo:
Sau khi quá trình cài đặt cơ bản bên trên kết thúc, hệ thống sẽ tự khởi động lại 1 lần. Các thiết lập sẽ tiếp tục ngay sau đó:
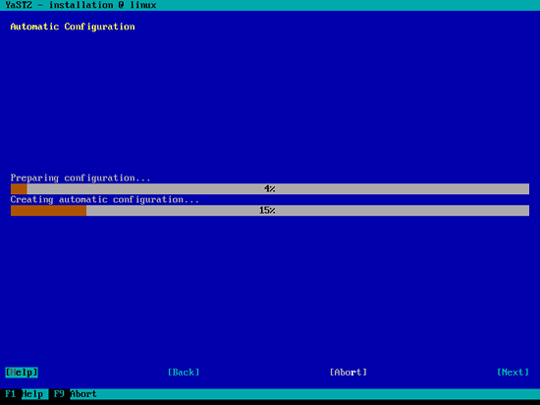
Khi kết thúc, bạn có thể đăng nhập với tên root và mật khẩu khởi tạo bên trên.
Thiết lập hệ thống mạng
Ở đây chúng ta sẽ sử dụng Yast – công cụ quản lý hệ thống của OpenSuSE để thiết lập lại các thông số mạng. Sau lần khởi động đầu tiên này, hệ thống mặc định được điều chỉnh để nhận địa chỉ IP với DHCP. Để sử dụng cho server, chúng ta sẽ chuyển sang địa chỉ IP tĩnh.
Gõ lệnh: yast2
và chọn Network Devices > Network Settings:
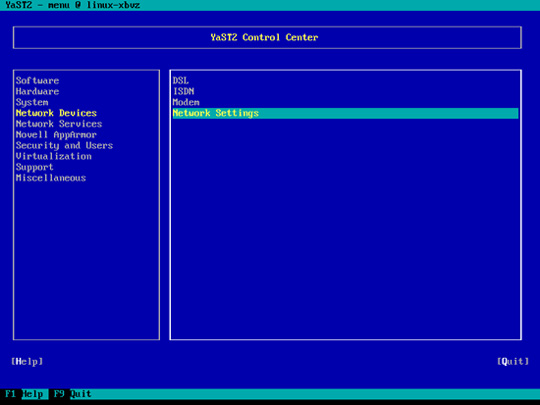
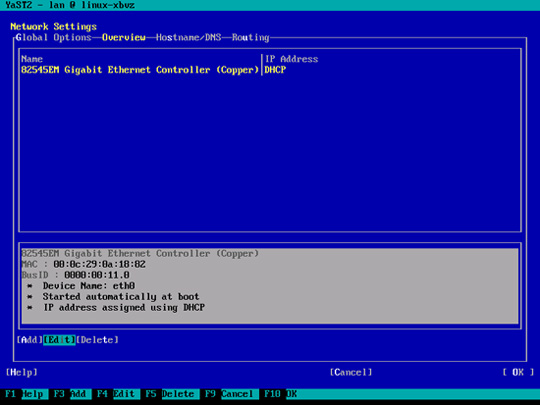
Chọn đúng card mạng của hệ thống, và nhấn Edit:
Sau đó chọn chế độ Statically assigned IP Address và điền địa chỉ IP, subnet mask và hostname, chọn Next để lưu các sự thay đổi và chuyển sang bước tiếp theo:
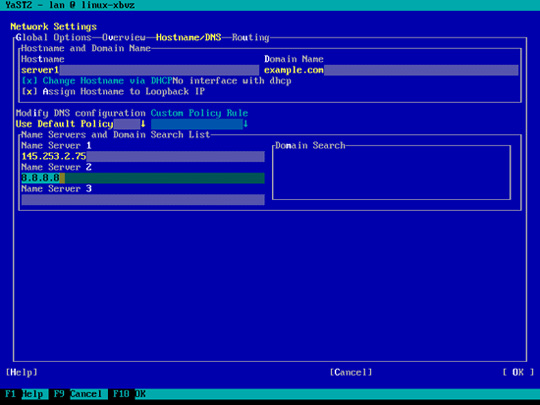
Tiếp theo, chọn phần Hostname/DNS và điền giá trị hostname (ở đây là server1.example.com) và nameserver (ví dụ 145.253.2.75 và 8.8.8.8):
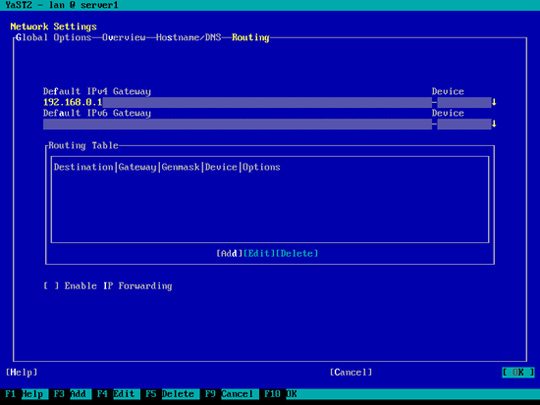
Chọn tiếp Routing và nhập giá trị gateway mặc định, sau đó OK:
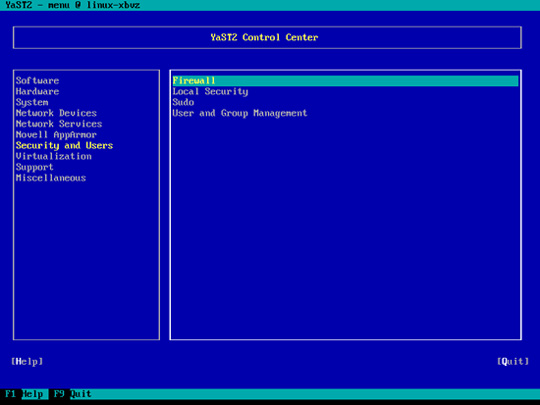
Thiết lập firewall qua Security and Users > Firewall trong Yast:
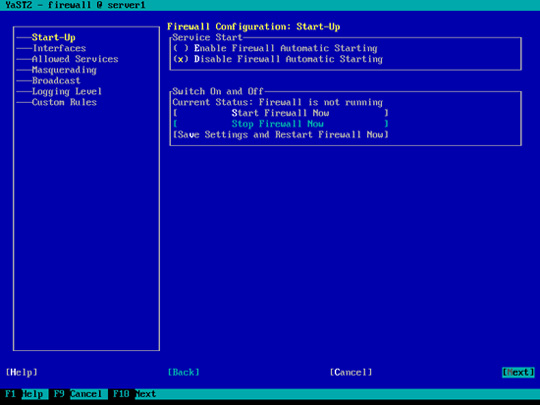
Chọn Disable Firewall Automatic Starting and Stop Firewall Now, và bấm Enter:
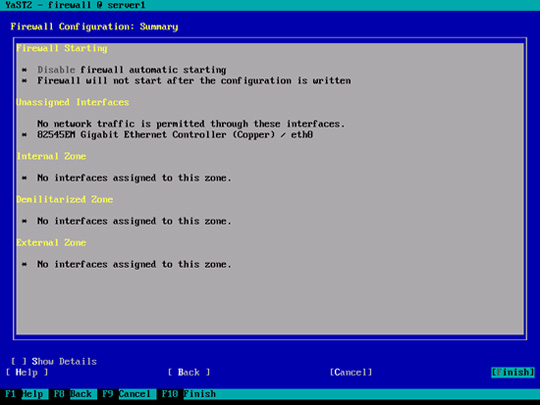
Tiếp theo, chọn Finish và thoát khỏi Yast:
Cập nhật hệ thống
Tiếp theo, chúng ta cần cài đặt và áp dụng các bản cập nhật mới nhất trực tiếp từ openSUSE repositories. Dùng lệnh sau:
zypper updateSau đó, khởi động lại hệ thống để áp dụng thay đổi:
rebootTìm hiểu về Journaled Quota
Để cài đặt Quota, dùng lệnh sau:
yast2 -i quotaChỉnh lại file /etc/fstab để trông giống như thế này (trong bài viết này, chúng ta phải thêm tham số usrjquota=aquota.user,grpjquota=aquota.group,jqfmt=vfsv0 để trỏ tới /srv):
vi /etc/fstab

/dev/sda1 swap swap defaults 0 0
/dev/sda2 / ext4 acl,user_xattr,usrjquota=aquota.user,grpjquota=aquota.group,jqfmt=vfsv0 1 1
/dev/sda3 /srv ext4 acl,user_xattr,usrjquota=aquota.user,grpjquota=aquota.group,jqfmt=vfsv0 1 2
proc /proc proc defaults 0 0
sysfs /sys sysfs noauto 0 0
debugfs /sys/kernel/debug debugfs noauto 0 0
devpts /dev/pts devpts mode=0620,gid=5 0 0
Sau đó chạy tiếp những lệnh sau:
touch /aquota.user /aquota.group
chmod 600 /aquota.*
touch /srv/aquota.user /srv/aquota.group
chmod 600 /srv/aquota.*

mount -o remount /
mount -o remount /srv

quotacheck -avugm
quotaon -avug
Không cần phải quá lo lắng khi bạn nhận được thông báo lỗi như sau, khi chạy quotacheck lần đầu tiên thì thường xuyên xảy ra điều này:
server1:~ # quotacheck -avugm
quotacheck: WARNING - Quotafile //aquota.user was probably truncated. Cannot save quota settings...
quotacheck: WARNING - Quotafile //aquota.group was probably truncated. Cannot save quota settings...
quotacheck: Scanning /dev/sda2 [/] done
quotacheck: Checked 4790 directories and 51422 files
quotacheck: WARNING - Quotafile /srv/aquota.user was probably truncated. Cannot save quota settings...
quotacheck: WARNING - Quotafile /srv/aquota.group was probably truncated. Cannot save quota settings...
quotacheck: Scanning /dev/sda3 [/srv] done
quotacheck: Checked 6 directories and 2 files
server1:~ #
Tiếp theo, chúng ta cần cài thêm 1 số gói hỗ trợ như sau:
yast2 -i findutils readline libgcc glibc-devel findutils-locate gcc flex lynx compat-readline4 db-devel wget gcc-c++ subversion make vim telnet cron iptables iputils man man-pages nano pico sudoHướng dẫn cài đặt Postfix, Dovecot, MySQL
Chạy lệnh sau:
yast2 -i postfix postfix-mysql mysql mysql-community-server mysql-client python libmysqlclient-devel dovecot12 dovecot12-backend-mysql pwgen cronSau đó mở file /etc/postfix/master.cf...
vi /etc/postfix/master.cfvà bỏ chú thích ở dòng sau:
[...]
tlsmgr unix - - n 1000? 1 tlsmgr
[…]
Tạo tiếp symlink sau:
ln -s /usr/lib64/dovecot/modules /usr/lib/dovecotKhởi động MySQL, Postfix, và Dovecot, đồng thời kích hoạt các dịch vụ khởi động:
chkconfig --add mysql
/etc/init.d/mysql start

chkconfig --add postfix
/etc/init.d/postfix start

chkconfig --add dovecot
/etc/init.d/dovecot start
Có thể bạn sẽ nhận được cảnh báo Dovecot sau đây, chỉ việc ignore:
Starting dovecot Warning: There is no way to login to this server: disable_plaintext_auth=yes, ssl=no, no non-plaintext auth mechanisms.
If you have trouble with authentication failures,
enable auth_debug setting. See http://wiki.dovecot.org/WhyDoesItNotWork
This message goes away after the first successful login.
Bước tiếp theo, chúng ta cần cài đặt thêm gói getmail (gói này không có sẵn trên OpenSUSE repository):
rpm -ivh http://download.opensuse.org/repositories/server:/mail/openSUSE_11.3/noarch/getmail-4.20.0-1.1.noarch.rpmHệ thống sẽ tiếp tục hiển thị những cảnh báo tương tự như sau:
warning: /var/tmp/rpm-tmp.OW27Dr: Header V3 DSA signature: NOKEY, key ID 367fe7fcbạn có thể tiếp tục bỏ qua thông tin này.
Để tăng độ bảo mật trong khi cài đặt MySQL, sử dụng lệnh sau:
mysql_secure_installationTiếp sau đó, trả lời 1 số câu hỏi như sau:
server1:~ # mysql_secure_installation


NOTE: RUNNING ALL PARTS OF THIS SCRIPT IS RECOMMENDED FOR ALL MySQL
SERVERS IN PRODUCTION USE! PLEASE READ EACH STEP CAREFULLY!


In order to log into MySQL to secure it, we'll need the current
password for the root user. If you've just installed MySQL, and
you haven't set the root password yet, the password will be blank,
so you should just press enter here.

Enter current password for root (enter for none): <-- gõ ENTER
OK, successfully used password, moving on...

Setting the root password ensures that nobody can log into the MySQL
root user without the proper authorisation.

Set root password? [Y/n] <-- gõ Y
New password: <-- điền mật khẩu SQL root
Re-enter new password: <-- điền mật khẩu SQL root
Password updated successfully!
Reloading privilege tables..
... Success!


By default, a MySQL installation has an anonymous user, allowing anyone
to log into MySQL without having to have a user account created for
them. This is intended only for testing, and to make the installation
go a bit smoother. You should remove them before moving into a
production environment.

Remove anonymous users? [Y/n] <-- gõ Y
... Success!

Normally, root should only be allowed to connect from 'localhost'. This
ensures that someone cannot guess at the root password from the network.

Disallow root login remotely? [Y/n] <-- gõ Y
... Success!

By default, MySQL comes with a database named 'test' that anyone can
access. This is also intended only for testing, and should be removed
before moving into a production environment.

Remove test database and access to it? [Y/n] <-- gõ Y
- Dropping test database...
... Success!
- Removing privileges on test database...
... Success!

Reloading the privilege tables will ensure that all changes made so far
will take effect immediately.

Reload privilege tables now? [Y/n] <-- gõ Y
... Success!

Cleaning up...


All done! If you've completed all of the above steps, your MySQL
installation should now be secure.

Thanks for using MySQL!


server1:~ #
Khi thực hiện xong thao tác trên, quá trình cài đặt SQL sẽ được đảm bảo an toàn.
Cài đặt Amavisd-new, Spamassassin và Clamav
Để cài đặt Amavisd-new, Spamassassin và ứng dụng bảo mật Clamav, chạy lệnh sau:
yast2 -i amavisd-new clamav clamav-db zoo unzip unrar bzip2 unarj perl-DBD-mysqlSau đó mở /etc/amavisd.conf ... :
vi /etc/amavisd.confvà thêm dòng $myhostname bằng giá trị hostname bên dưới dòng $mydomain:
[...]
$mydomain = 'example.com'; # a convenient default for other settings
$myhostname = "server1.$mydomain";
[…]
Sau đó tạo symlink từ /var/run/clamav/clamd tới /var/lib/clamav/clamd-socket:
mkdir -p /var/run/clamav
ln -s /var/lib/clamav/clamd-socket /var/run/clamav/clamd
Để kích hoạt các dịch vụ tương ứng, chạy lệnh sau:
chkconfig --add amavis
chkconfig --add clamd
/etc/init.d/amavis start
/etc/init.d/clamd start
Cài đặt Apache 2 Webserver và PHP5
Muốn cài Apache2 và suphp thì dùng lệnh sau:
yast2 -i apache2 apache2-mod_fcgidCài PHP5:
yast2 -i php5-bcmath php5-bz2 php5-calendar php5-ctype php5-curl php5-dom php5-ftp php5-gd php5-gettext php5-gmp php5-iconv php5-imap php5-ldap php5-mbstring php5-mcrypt php5-mysql php5-odbc php5-openssl php5-pcntl php5-pgsql php5-posix php5-shmop php5-snmp php5-soap php5-sockets php5-sqlite php5-sysvsem php5-tokenizer php5-wddx php5-xmlrpc php5-xsl php5-zlib php5-exif php5-fastcgi php5-pear php5-sysvmsg php5-sysvshm ImageMagick curl apache2-mod_php5

rpm -ivh http://download.opensuse.org/repositories/server:/php/openSUSE_11.3/x86_64/suphp-0.7.1-3.1.x86_64.rpm
Sau đó, chạy lệnh sau để kích hoạt và sử dụng các module của Apache:
a2enmod suexec
a2enmod rewrite
a2enmod ssl
a2enmod actions
a2enmod suphp
a2enmod fcgid
chown root:www /usr/sbin/suexec2
chmod 4755 /usr/sbin/suexec2
Sau đó khởi động Apache:
chkconfig --add apache2
/etc/init.d/apache2 start
Tiếp đó là cài đặt phpMyAdmin:
rpm -ivh http://download.opensuse.org/repositories/server:/php:/applications/openSUSE_11.3/noarch/phpMyAdmin-3.3.4-1.1.noarch.rpmTiếp tục bỏ qua những cảnh báo như sau:
warning: /var/tmp/rpm-tmp.kRRPEK: Header V3 DSA signature: NOKEY, key ID ddcd7f1aCài đặt PureFTPd
Các bạn có thể dùng lệnh sau để cài pure-ftpd FTP daemon:
yast2 -i pure-ftpd quota

chkconfig --add pure-ftpd
/etc/init.d/pure-ftpd start
Cài đặt BIND
Để cài đặt nameserver BIND, dùng lệnh sau:
yast2 -i bindTạo đường dẫn khởi động cho BIND và kích hoạt chế độ:
chkconfig --add named
/etc/init.d/named start
Cài đặt công cụ hỗ trợ thống kê Webalizer và AWStats
Từ khi ISPConfig 3 hỗ trợ người dùng sử dụng Webalizer hoặc AWStats để tạo số liệu thống kê, chúng ta sẽ cài đặt và sử dụng cả 2:
yast2 -i webalizer perl-DateManip

rpm -ivh http://download.opensuse.org/repositories/network:/utilities/openSUSE_11.3/noarch/awstats-6.95-3.1.noarch.rpm
Cài đặt fail2ban
Dùng lệnh sau:
yast2 -i fail2banVới Jailkit:
rpm -ivh http://download.opensuse.org/repositories/security/openSUSE_11.3/x86_64/jailkit-2.11-1.2.x86_64.rpmĐồng bộ hóa giờ hệ thống
Nếu bạn muốn đồng bộ giờ hệ thống với NTP server thì sử dụng lệnh sau:
yast2 -i xntpTạo đường dẫn khởi động cho ntp, và khởi động luôn dịch vụ này:
chkconfig --add ntp
/etc/init.d/ntp start
Cài đặt ISPConfig 3
Truy cập vào trang web Tải ISP Config, tải phiên bản mới nhất và cài đặt lên hệ thống. Quá trình cài đặt của ISPConfig sẽ tự động thiết lập các thông số cho Postfix, Dovecot…:
cd /tmp
wget http://downloads.sourceforge.net/ispconfig/ISPConfig-3.0.2.2.tar.gz?use_mirror=
tar xvfz ISPConfig-3.0.2.2.tar.gz
cd ispconfig3_install/install/
Bắt đầu quá trình cài đặt bằng lệnh:
php -q install.php

server1:/tmp/ispconfig3_install/install # php -q install.php


--------------------------------------------------------------------------------
_____ ___________ _____ __ _
|_ _/ ___| ___ \ / __ \ / _(_)
| | \ `--.| |_/ / | / \/ ___ _ __ | |_ _ __ _
| | `--. \ __/ | | / _ \| '_ \| _| |/ _` |
_| |_/\__/ / | | \__/\ (_) | | | | | | | (_| |
\___/\____/\_| \____/\___/|_| |_|_| |_|\__, |
__/ |
|___/
--------------------------------------------------------------------------------


>> Initial configuration

Operating System: openSUSE or compatible, unknown version.

Following will be a few questions for primary configuration so be careful.
Default values are in [brackets] and can be accepted with <ENTER>.
Tap in "quit" (without the quotes) to stop the installer.


Select language (en,de) [en]: <-- gõ ENTER

Installation mode (standard,expert) [standard]: <-- gõ ENTER

Full qualified hostname (FQDN) of the server, eg server1.domain.tld [server1.example.com]: <-- ENTER

MySQL server hostname [localhost]: <-- gõ ENTER

MySQL root username [root]: <-- gõ ENTER

MySQL root password []: <-- mật khẩu SQL root

MySQL database to create [dbispconfig]: <-- gõ ENTER

MySQL charset [utf8]: <-- gõ ENTER

chown: cannot access `/var/vmail': No such file or directory
Generating a 2048 bit RSA private key
......+++
........+++
writing new private key to 'smtpd.key'
-----
You are about to be asked to enter information that will be incorporated
into your certificate request.
What you are about to enter is what is called a Distinguished Name or a DN.
There are quite a few fields but you can leave some blank
For some fields there will be a default value,
If you enter '.', the field will be left blank.
-----
Country Name (2 letter code) [AU]: <-- gõ ENTER
State or Province Name (full name) [Some-State]: <-- gõ ENTER
Locality Name (eg, city) []: <-- gõ ENTER
Organization Name (eg, company) [Internet Widgits Pty Ltd]: <-- gõ ENTER
Organizational Unit Name (eg, section) []: <-- gõ ENTER
Common Name (eg, YOUR name) []: <-- gõ ENTER
Email Address []: <-- gõ ENTER
Configuring Jailkit
Configuring Dovecot
chmod: cannot access `/etc/dovecot/dovecot-sql.conf~': No such file or directory
Configuring Spamassassin
Configuring Amavisd
Configuring Getmail
Configuring Pureftpd
Configuring BIND
Configuring Apache
Configuring vlogger
Configuring Apps vhost
Configuring Firewall
Installing ISPConfig
ISPConfig Port [8080]: <-- gõ ENTER

Configuring DBServer
Installing Crontab
no crontab for root
no crontab for getmail
Restarting services ...
Restarting service MySQL
Shutting down service MySQL ..done
Starting service MySQL ..done
Shutting down mail service (Postfix)..done
Starting mail service (Postfix)..done
Waiting for the process [3233] to terminate
Waiting for the process [3233] to terminate
Waiting for the process [3233] to terminate
Daemon [3233] terminated by SIGTERM
Shutting down virus-scanner (amavisd-new): ..done
Starting virus-scanner (amavisd-new): ..done
/usr/bin/lsb_release: line 367: echo: write error: Broken pipe
/usr/bin/lsb_release: line 367: echo: write error: Broken pipe
Shutting down Clam AntiVirus daemon ..done
/usr/bin/lsb_release: line 367: echo: write error: Broken pipe
Starting Clam AntiVirus daemon ..done
Stopping dovecot ..done
Starting dovecot ..done
Syntax OK
Shutting down httpd2 (waiting for all children to terminate) ..done
Starting httpd2 (prefork) ..done
Shutting down pure-ftpd..done
Starting pure-ftpd..done
Installation completed.
server1:/tmp/ispconfig3_install/install #
Tiếp theo, tạo symlink cho phpMyAdmin như sau:
ln -s /srv/www/htdocs/phpMyAdmin /usr/local/ispconfig/interface/web/phpmyadminXóa bỏ thư mục /tmp:
rm -rf /tmp/ispconfig3_install
rm -f /tmp/ISPConfig-3.0.2.2.tar.gz
Sau đó mở file /etc/suphp.conf ... :
vi /etc/suphp.confvà hãy chắc chắn rằng trong file này có chứa tham số x-httpd-suphp thay vì x-httpd-php ở phía cuối:
[...]
[handlers]
;Handler for php-scripts
;x-httpd-php="php:/usr/bin/php-cgi5"
x-httpd-suphp="php:/usr/bin/php-cgi5"
[…]
Để đăng nhập vào bảng điều khiển ISPConfig, gõ địa chỉ tương ứng vào trình duyệt (chỉ cần thay thế địa chỉ IP của bạn):
http://192.168.0.100:8080/Tài khoản mặc định là user: admin và password: admin.
Cài đặt SquirrelMail
Để cài ứng dụng email client dựa trên web – SquirrelMail, chúng ta sử dụng câu lệnh sau:
rpm -ivh http://download.opensuse.org/repositories/server:/php:/applications/openSUSE_11.3/noarch/squirrelmail-1.4.20-1.1.noarch.rpm

ln -s /srv/www/htdocs/squirrelmail /usr/local/ispconfig/interface/web/webmail
Tắt bỏ ứng dụng AppArmor
AppArmor thực chất là 1 ứng dụng an ninh mở rộng của SUSE (gần giống với SELinux của Fedora), trong bài thử nghiệm này, chúng ta không thực sự cần đến AppArmor (cài thêm vào chỉ làm giảm tốc độ và hiệu suất của hệ thống vì chúng ta đã có Clamav):
/etc/init.d/boot.apparmor stop
chkconfig -d boot.apparmor
Trên đây là 1 số hướng dẫn và cách làm cơ bản để xây dựng hệ thống OpenSUSE server 11.3 trên nền tảng x86_64. Chúc các bạn thành công!
 Công nghệ
  AI
AI  Windows
  iPhone
  Android
  Học IT
  Download
  Tiện ích
  Khoa học
  Game
Game  Làng CN
  Ứng dụng


 Linux
Linux  Đồng hồ thông minh
  macOS
macOS  Chụp ảnh - Quay phim
  Thủ thuật SEO
  Phần cứng
  Kiến thức cơ bản
  Lập trình
  Dịch vụ công trực tuyến
  Dịch vụ nhà mạng
  Quiz công nghệ
  Microsoft Word 2016
  Microsoft Word 2013
  Microsoft Word 2007
  Microsoft Excel 2019
  Microsoft Excel 2016
  Microsoft PowerPoint 2019
  Google Sheets
  Học Photoshop
  Lập trình Scratch
  Bootstrap
  Năng suất
  Game - Trò chơi
  Hệ thống
  Thiết kế & Đồ họa
  Internet
  Bảo mật, Antivirus
  Doanh nghiệp
  Ảnh & Video
  Giải trí & Âm nhạc
  Mạng xã hội
  Lập trình
  Giáo dục - Học tập
  Lối sống
  Tài chính & Mua sắm
  AI Trí tuệ nhân tạo
  ChatGPT
  Gemini
  Prompt
  Điện máy
  Tivi
Tivi  Tủ lạnh
  Điều hòa
  Máy giặt
  Cuộc sống
  TOP
TOP  Kỹ năng
  Món ngon mỗi ngày
  Nuôi dạy con
  Mẹo vặt
  Phim ảnh, Truyện
  Làm đẹp
  DIY - Handmade
  Du lịch
  Quà tặng
  Giải trí
  Là gì?
  Nhà đẹp
  Giáng sinh - Noel
  Ô tô, Xe máy
  Tấn công mạng
  Chuyện công nghệ
  Công nghệ mới
  Trí tuệ Thiên tài